Subscribe to the Quilt Blocks Digest newsletter for updates, special offers & exclusive content!
- Home
- Other Quilt Blocks
- Disappearing 4 Patch
Disappearing 4 Patch
Quilt Block Pattern Tutorial
The disappearing 4 patch quilt block is a clever scrappy version of a four patch block. See how easy it is to make a 4 patch disappear!
This variation of the simple four patch block is fun, versatile and can be made as scrappy as you like. Just use a different fabric for each patch.
It can be arranged in many different ways. Start with a four simple patches sewn together into a block.
Slice the block four times - twice on both sides of each center line - and you end up with nine patches: 5 squares and 4 rectangles.
Then, rearrange the rectangles around the center square to make it scrappier and you now have a very dynamic quilt block. Exciting!
This is the perfect time to use some of your scraps or those layer cakes that you've been saving!
This block looks especially great when use one print fabric along with two shades of another fabric in a solid.
This will become crystal-clear in the steps below :-).
Okay, let's see how to make it.
Block Size Measurements
Here are the cutting measurements for a four patch quilt block in eight sizes, including the 12 inch and layer cake (10 inch) sizes, along with each approximate size of the resulting disappearing four patch block.

(Note: To increase photo size, on your keyboard hold 'Ctrl' and hit the + key.)
A disappearing four-patch block will be about two inches smaller than the simple 4 patch.
Disappearing 4 Patch Quilt Block Pattern Instructions
Step 1 Make a 4 Patch Block Choose your block size and number of different fabrics. Using the measurements in the size chart above cut your fabric accordingly.
Make a simple four patch quilt block remembering to press the seams between the patches in opposite directions.

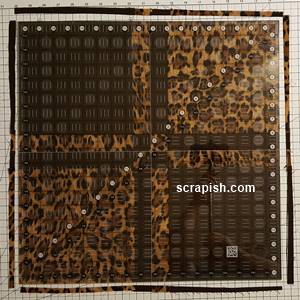
Step 2a Cutting the Block We will slice up the entire block, once on both sides of each center seam line, to create 9 patches. (It will be very helpful to use a rotating cutting mat to reduce the chance of disturbing the patches when making the cuts.)
If you're not using a rotating cutting mat you may need to walk around your cutting table or area to be in a better position to make the second cut.
Diagram 1 shows where each cut will be made.
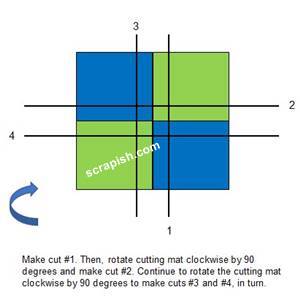 Diagram 1
Step 2b Line Up Ruler and Make Cuts Line up the 1 1/2 inch measurement line of a ruler on the vertical center seam line.
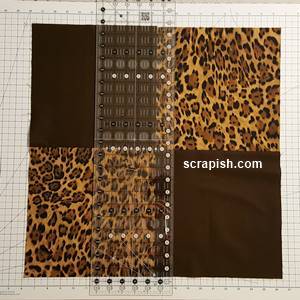
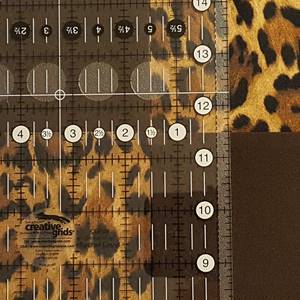 close up of ruler lined up on center seam line at 1 1/2 inches
Make cut #1.
As shown in Diagram 1 above, rotate the cutting mat clockwise by 90 degrees. Reposition the ruler along the new vertical seam line 1 1/2 inches away from the center seam line and make cut #2.
Continue to rotate the cutting mat clockwise by 90 degrees to make cuts #3 and #4, in turn. Repositioning the ruler along the new vertical seam line 1 1/2 inches away from the center seam line each time.
Step 3 Separate Patches Separate the patches and watch your simple four patch disappear into a nine patch block (aka disappearing 4 patch). Crazy cool, right!
You now have 4 large squares - one in each outer corner; 4 rectangles one between each large square - made up of two different fabrics; and 1 center small four patch square.
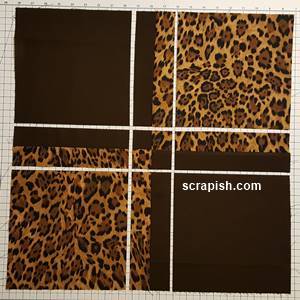
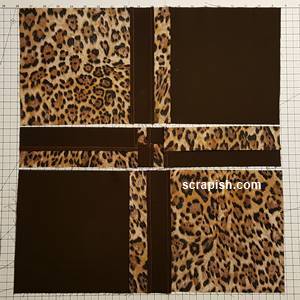
Step 4 Rearrange Rectangles Let’s play... Starting with the rectangle (1) in the top row and going clockwise, move each rectangle to the next row as shown in the diagram below.
Leave the center and 4 large squares as is. See the results in the next picture.
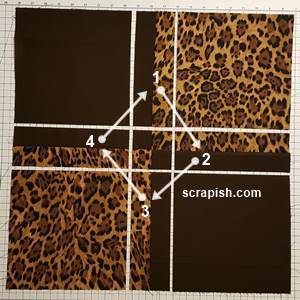
Disappearing Four Patch
When each rectangle is moved 90 degrees a different or opposite fabric touches each large square.
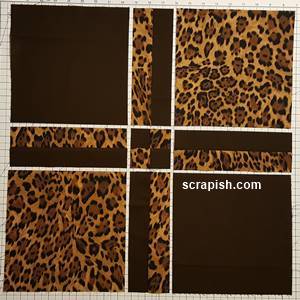 disappearing 4 patch
Step 5a Stitch the Block Starting with Row 1, stitch the patches of each row together using a 1/4 inch seam. (To see step by step pictures here's how you stitch a block together.)
Repeat for Row 2.
Repeat for Row 3.
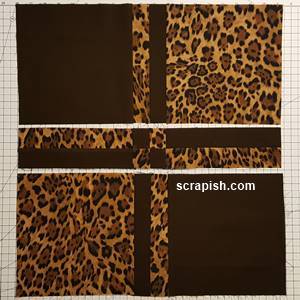
Step 5b Press Back of the block showing pressed seams.
Close-up of pressing directions. It may seem confusing I know. :-) Just remember to press so that seams can nest together when stitching.
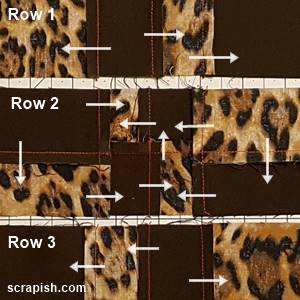 pressing direction
Step 5c Stitch Rows Stitch the rows together using a 1/4 inch seam.
Row 2 to 1: (Not Pictured) Flip Row 2 face down over Row 1 with right sides together. (The top of Row 2 should be aligned with the bottom of Row 1.)
Nest the seams. Pin the middle seam first, the pin the seams on either side of the center seam. Pin along the seam and at each end of the row.
Stitch the seam. Press the seam upward, towards Row 1.
Flip Row 2 downward so it faces right side up.
Row 3 to 2: (Not Pictured) Flip Row 3 face down over Row 2 with right sides together. (The top of Row 3 should be aligned with the bottom of Row 2.)
Nest the seams. Pin the middle seam first, the pin the seams on either side of the center seam. Pin along the seam and at each end of the row.
Stitch the seam. Press the seam downward, towards Row 3.
Flip Row 3 so it faces right side up.
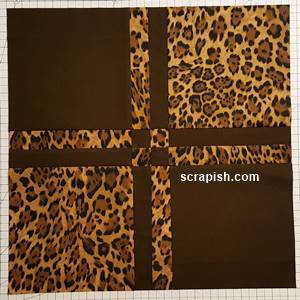
Your disappearing 4 patch quilt block is now complete!
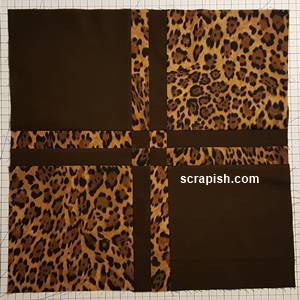
Step 6 Press Block Take it to the ironing board and give the block a final press.
Here's the backside of the disappearing 4 patch quilt block pattern. You can see how the seams are pressed.
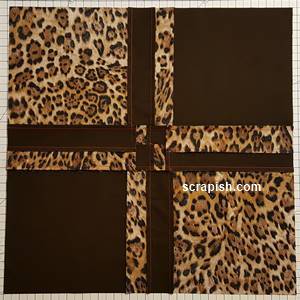
Step 7 Trim Block Square up or trim the block to its finished size plus 1/2 seam allowance. Here, I squared my block to 18 1/2 inches. (Yeah, I like big blocks! :-) )
Disappearing 4 Patch - Layout 2
You're not limited to using just two different fabrics. You can use four fabrics and arrange them in any order that you choose.
You will get a different look. Here, I chose to rearrange the rectangles with animal print fabric along the vertical center.
I also turned the center square so that it did not rest against a matching fabric.
 4 different fabrics used
Disappearing Four Patch - Cutting Lines
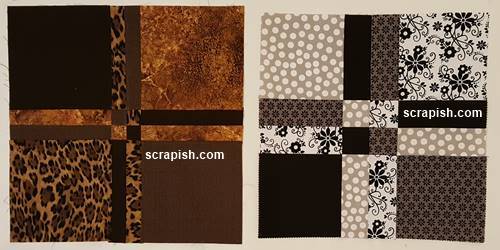
Also, you can vary the width of the cutting line.
I experimented with cutting all four lines at 1 1/2 inches (block on the right) and 2 1/2 inches (block on the left). I decided that I like a narrow width best.
Due to the seam allowance and having to nest seems I probably would not make my cutting lines less than 1 inch from the center seam line.
 cutting line width comparison
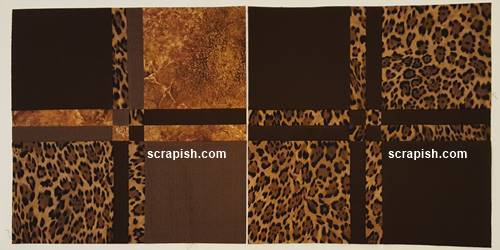
Disappearing Four Patch - 4 vs 2 Fabrics
See the look you get from using four fabrics (block on the right) versus two fabrics (block on the left).
 using 4 fabrics vs 2 fabrics
Disappearing 4 Patch - The Gift
The disappearing four patch quilt block is a very cool block!
Did you notice how it looks like a present? Especially when you use two different fabrics.
The vertical and horizontal rectangles look similar to a ribbon on a gift.
Experiment with different fabrics and the placement of the rectangles to make the block your own!
Subscribe to the Quilt Blocks Digest newsletter for updates, special offers & exclusive content!
You will receive an email asking you to confirm your consent to subscribe. You must click on the confirmation link contained in that email in order to be subscribed and receive emails.
Your email address is never shared. Unsubscribe any time.
