Subscribe to the Quilt Blocks Digest newsletter for updates, special offers & exclusive content!
- Home
- Other Quilt Blocks
- Shoo Fly
Shoo Fly Quilt Block Pattern Tutorial
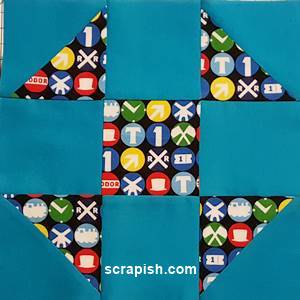
The shoo fly quilt block (aka monkey wrench) is an easy traditional block. It looks a lot like the churn dash. Let's see step by step how to make it.
This block is known by many names: Monkey Wrench, Churn Dash, Hole in the Barn Door, Shoofly, or Shoo Fly.
This block has been found on quilts that are believed by many to have been hung in plain sight to help slaves navigate their way along the Underground Railroad.
The shoofly pattern is believed to refer to an actual person who might have aided escaping slaves.
Today, I'm sure that you will find many uses for this block.
Use it in baby quilts with fabrics depicting baby animals or things that babies might use.
In a quilt for a teenager bright colored solid fabrics or fabrics that have geometric shapes that depict science or math would look awesome!
Block Fabric Requirements
Traditionally, this block is made with two different contrasting fabrics. The greater the contrast the more the block design stands out.
In the past black and white were very popular colors for this block. Today, black and white is still a great color combo. So is red and white or blue and white.
In this tutorial I have designated fabrics as follows
- Fabric A = primary, or focus (print fabric)
- Fabric B = background (blue solid fabric)
Block Measurements
Here are the unit cutting measurements to make a 6 inch, 9 inch and 12 inch shoo fly block.
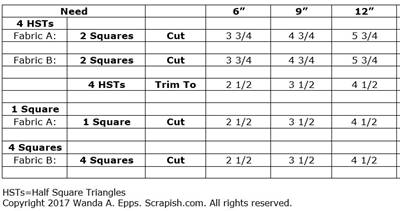
(Note: To increase photo size, on your keyboard hold 'Ctrl' and hit the + key.)
Simply choose your block size, cut your fabric accordingly and follow the instructions below to make the block.
Block Layout
This block is laid out on a 3 x 3 grid - 3 rows and 3 columns .
Finished block sizes that are evenly divisible by three - 6, 9, 12, 15 and 18 inch finished block sizes - will be the easiest quilt block to construct.
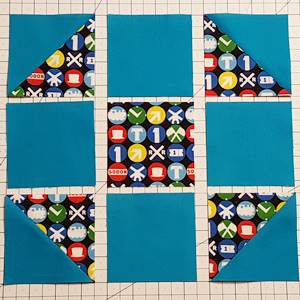
The 9 units that make up the block are
- 4 half square triangles (aka HSTs)
- 5 plain squares
Shoo Fly Quilt Block Pattern Instructions
Step 1 Make 4 half square triangles (not pictured here, but see photo in Step 3 - click the link for how to instructions) using a print (fabric A) and a background (fabric B) fabric.
Press the seams open.
Step 2 From background fabric B cut 4 squares (not pictured here, but see photo in Step 3) the size needed for the block that you are making.
From primary fabric A, cut 1 square (not pictured here, but see photo in Step 3) the size needed for the block that you are making.
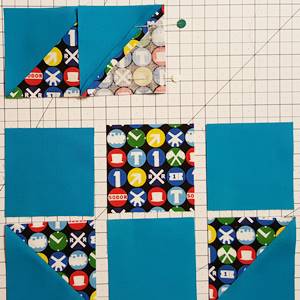
Step 3 Next to your sewing machine layout the block in the grid format as pictured below.
The primary fabric A, which makes up the shoo fly quilt block pattern, should be pointing to the inside of the block.
The half square triangles should be placed in the four corners with a plain square cut from background fabric placed in between.
The center square is cut from the primary or focus fabric.
 grid lay out of quilt block pattern
Step 4 Without changing the orientation of the patch units sew together the patches of each row.
Sew the patches of row 1 together. With right sides together, place the plain square from row 1 column 2 on top of the half square triangle from row 1 column 1.
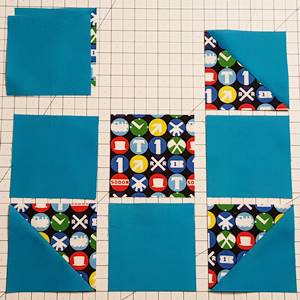 Row 1: sew together units 1 and 2
Sew the units together using a 1/4 inch seam along the right side of the block units. Finger press the seam towards the HST.
Step 4b With right sides together, sew the HST unit from row 1, column 3 to the plain square in row 1, column 2, using a 1/4 inch seam. Pin if desired.
 Row 1: sew together units 3 and 2
Finger press the seam towards the HST. Row 1 units are now sewn together.
Step 5 In the same manner as Step 4, sew the units of row 2 together, finger pressing the seams towards the center square.
Then, sew the units of row 3 together, finger pressing the seams towards the HSTs.
Here's a look at the back of the block, showing the patches sewn together and the pressing direction of each seam.
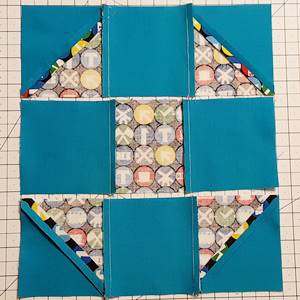 pressing direction of each row
Take the sewn rows to the ironing board and press this seams (not pictured).
For flatter seams, use a starch alternative pressing solution if desired.
Step 6 Now sew the rows of the shoo fly quilt block pattern together.
Place row 1 face down over row 2 with right sides together. The bottom of row 1 should be sewn to the top of row 2.
Nest the seams and pin on both sides of each seam as well as at each end of the row.
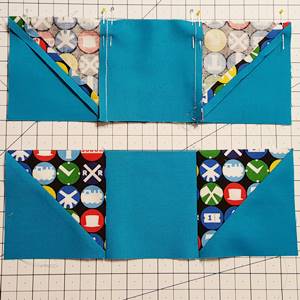 Sew together rows 1 and 2
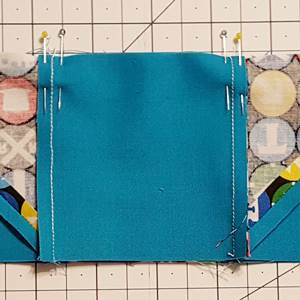 closeup of middle seams pinned together
With rows 1 and 2 sewn together, press the seam upward, toward row 1.
Step 6a Now sew row 3 to row 2 in the same manner. The the top of row 3 should be sewn to bottom of row 2 . Press the seam downward, toward row 3.
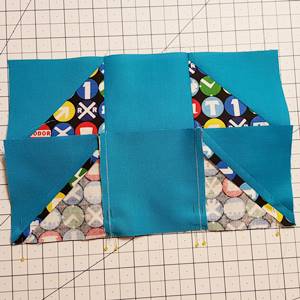 sew row 3 to row 2
Step 7 Once the block is sewn together, take it to the ironing board and give it a final press.
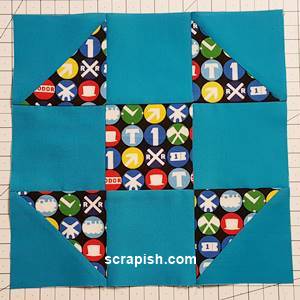 rows 3 and 2 sewn together, block finished
Here's the backside of the shoo fly quilt block pattern. You can see how the seams are pressed.
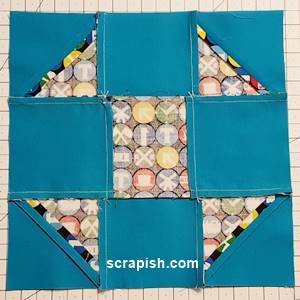 backside of block pattern
This block is related to and put together much like the churn dash quilt block, but it's even easier!
Make it your own. Try reversing the fabrics. Use a print as the background fabric and a solid fabric the highlight the 'shoo fly'.
Subscribe to the Quilt Blocks Digest newsletter for updates, special offers & exclusive content!
You will receive an email asking you to confirm your consent to subscribe. You must click on the confirmation link contained in that email in order to be subscribed and receive emails.
Your email address is never shared. Unsubscribe any time.
