Subscribe to the Quilt Blocks Digest newsletter for updates, special offers & exclusive content!
- Home
- How to Quilt
- How to Cut Quilt Squares
How to Cut Quilt Squares and Quilting Strips
Step-by-step see how to cut quilt squares with a rotary cutter using two quilting rulers. First, cut the quilting strips accurately, then subcut into squares. Easy for beginners!
You as a beginner quilter want to know how to cut quilt fabric accurately, or more accurately. Here's one way we quilters do it...
- Use two quilting rulers to cut fabric yardage into strips. Then, subcut the strips into squares, rectangles, triangles and so on.
- Use the measurement lines on the ruler, not the rotary cutting mat.
I first learned this technique by watching the video class Clever Cuts for Efficient Quilting with Debbie Caffrey.
Quilting ruler #1 is usually long enough to span of fabric when folded twice (you'll see this in the pictures below). In this tutorial, I used a 2 1/2 x 18 inch quilting ruler.
Quilting ruler #2 is usually wide enough to span the width of the fabric strip that you cut and the block size that you need. I used a 6 1/2 x 12 1/2 inch ruler.
How to Cut Quilt Squares Instructions
The more fabric yardage you have the more room you'll need and the more difficult the fabric is to handle and cut. Here, I'm working with about a 1/2 yard of fabric.
Lefties: lay or cut in the opposite direction given.
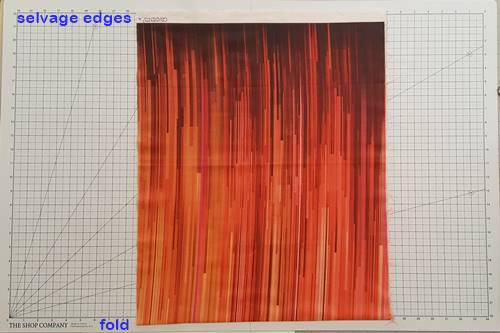
Step 1 Leave the fabric folded as it was cut from the bolt. Lay the fabric on your cutting mat with the fold edge towards to you and the selvage edges away from you. Align the selvage edges and repress the fold, by hand or iron, if necessary.

Step 2 Take the folded edge up to and align it with the selvage edges. Now you have four layers of fabric.

Step 3 Insert a quilting ruler between the second and third layers against the fold. Hold the selvages and top fold with one hand while gently pulling the ruler against the bottom fold to remove any creases in or space between the folds of the fabric.

Cutting Quilting Strips Using Two Quilting Rulers
Before cutting a strip fabric you need to get a straight edge along the left side of the fabric.
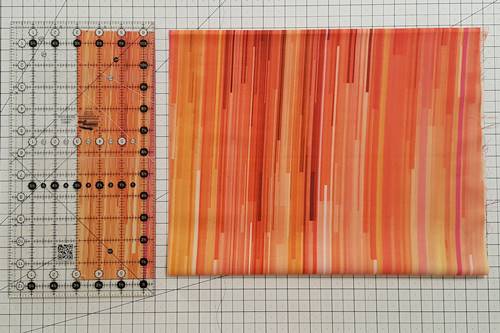
Step 4 Place a quilting ruler on the fabric, aligning a horizontal measurement line along the fold and the left edge of the ruler about 1/4 to 1/2 inch in from the raw edge of the fabric.

Step 5 Here's a close-up shot of Step 4. Be sure that all four layers of the raw edges are to the left of the ruler's edge.

Step 6 Abut a second quilting ruler against the left side of the first, aligning a horizontal measurement line along the fold.

Step 7a Remove the ruler on the right. Using a rotary cutter, cut the fabric by rolling it along the remaining ruler's edge.

A Note on How to Cut Quilt Squares
When cutting strips or squares, cut the strip or square the size of the square you need plus 1/2 inch (for seam allowance).
For example, if you want a 3-inch finished size square cut a 3 1/2 inch square. The 1/2 inch is to allow for a 1/4 inch seam allowance on all sides.
In quilting, a 1/4 inch seam is used in almost every quilt block.
Step 7b Slide ruler along the fabric until the vertical measurement line for the size square that you are cutting is aligned with the left straight edge of the fabric. Keep the horizontal measurement line aligned with the fold. Make a cut as in Step 7a.

Step 7c To cut a second (and successive) strip, align the measurement line for the size square that you are cutting along the raw edge of the fabric to be cut. Ensure that the bottom and left measurement lines align straight along the fabric fold and the raw edges. Use the rotary cutter and cut the fabric.

Cutting Quilting Squares With a Rotary Cutter
When you said you wanted to know how to cut quilt squares, did you know that you would need to cut strips first and then cut squares? :-) Now repeat the above cutting process for each strip to cut the quilt squares.
Step 8a Unfold the strips so that you are working with the original two layers of fabric. Lay strip lengthwise with selvage edge on left. Position the two quilting rulers as done in Steps 4 - 6. Instead of the raw edges the selvage edges are now under a ruler.

Step 8b Remove the ruler on the right. Use the rotary cutter and cut off the selvage edge.

How to Cut Quilt Squares Using a Quilting Ruler and Rotary Cutter
Step 8c Slide ruler along the fabric until the vertical measurement line for the
size square that you are cutting is aligned with the left straight edge. Align a horizontal measurement line along the bottom straight edge. Make the cut by rolling the rotary cutter along the ruler's right edge to cut the fabric. You've cut a quilt square!

Step 8d To cut more squares, align the horizontal measurement line (for the size square that you want to cut) along the straight edge of the remaining piece of fabric strip. Use the rotary cutter as done in Step 8c to cut another square.

Step 8e Repeat Step 8d for the entire strip.
This cutting process works for whatever size squares you need to cut, large or small - 5 inch, 6 inch, 9 inch, 10 inch, 12 inch or whatever. Remember, simply cut a width of fabric, or shorter, strip the size of the square you need plus 1/2 inch (for seam allowance).
Hopefully, this lesson on How to Cut Quilt Squares showed you how easy it is to cut quilting strips, then squares. But it's just one way. Check out some others methods too!
Subscribe to the Quilt Blocks Digest newsletter for updates, special offers & exclusive content!
You will receive an email asking you to confirm your consent to subscribe. You must click on the confirmation link contained in that email in order to be subscribed and receive emails.
Your email address is never shared. Unsubscribe any time.


